Skip to Main Content

When using an anonymizing VPN, Check your DNS Servers!

If you are like most home broadband users, your machine is either connected directly to a broadband modem, or connected to a router that is connected to a broadband modem,  Your machine gets all of its addressing information over DHCP from the modem or router, and all is well. If you’re using a router, chances are that your router is getting its DNS settings over DHCP, from your ISP.  This means that your computer is using DNS servers that are linked to your ISP in your area.

If you start up a VPN session, ideally you receive a new set of DNS servers from the VPN endpoint, however, that is not always the case.  What can end up happening is that your machine sends a DNS query through the encrypted pipe, to your local ISP controlled DNS server.  Why is this bad?  Because, when an ISP gets a DNS request from a known VPN provider, they can simply look for a user sending traffic to that VPN’s IP address, in their local area.  Once they find that, they potentially have a one to one mapping between user and data requested.

So, how do I fix it?  If you’re lucky, your VPN provides you with DNS servers.  Use them for ALL traffic, not just encrypted VPN use.  If you aren’t so lucky, you can mitigate the issue by using a large scale DNS server that doesn’t serve a specific area, such as Google’s DNS servers (8.8.8.8 and 8.8.4.4).  These will log data, but through the VPN, they have no reasonable way of identifying you through the data.

Special Case: Proxy to VPN
If you are using my AnonyBox, or another proxy solution to connect to your VPN, your browser may be sending your DNS queries directly through your connection to your ISP, unencrypted.  This is VERY BAD.

Chrome is the only browser that handles the situation correctly by default.  As long as you are using a SOCKS v5 proxy or HTTP proxy, all DNS queries are made proxy-side.  However, if you are using a SOCKS v4 proxy, you are not safe.

In Firefox, you will need to change a setting.  Type “about:config” into the address bar, and find the line that reads “network.proxy.socks_remote_dns”.  Set it to true and restart Firefox.  For Firefox, you will want to ensure that you are using a SOCKS v5 proxy, and not an HTTP proxy.

As always, stay safe and have fun.

Fixing Unicode Support in Google Chrome

[notification type=”alert-warning” close=”false” ]This fix no longer works for recent versions of Chrome.  At this point no solution is known.[/notification]


If you’re a Chrome user on Windows, you’ve likely noticed that support for international characters and unicode glyphs is pretty bad.  If you’ve ever visited a foreign page, or one that uses the full UTF8 character set, you’ve probably seen something like this:

These boxes are the “missing glyph” symbol, and represent a character that Chrome cannot render.  Firefox, on the other hand, displays them quite well.

As it turns out, the issue is not really Chrome’s fault.  When Chrome encounters a glyph that doesn’t exist in the font used to render a page, it attempts to find that glyph in a list of common fonts that the user might have available.  It’s only after exhausting that list that the missing glyph symbol is shown.

You might ask, why are there so many missing glyphs in Chrome on Windows, and why doesn’t Firefox have the same issue?  The answer to the first question is that Windows doesn’t, by default, include any of these common fonts that have good unicode support.  In fact, Windows includes NO font with good unicode support, out of box.  The second part is actually a pretty smart hack from the Mozilla team.  Firefox contains an internal glyph set to fall back on, if the system cannot display the character.

So, now that we understand the issue, how do we fix it?  Easy, install one of the font sets that Chrome knows to check for unicode glyphs, namely Code2000.

Code2000, Code2001, and Code2002 are three true-type fonts that were designed by James Kass in 2008.  They are known as a Pan-Unicode font set, designed to contain as many glyphs as possible.  They were available for free, from Kass’ website, until it went down in 2011.

I have hosted a mirror with my fbformat project, to enable unicode formatting in Chrome.  Simply download the ZIP, extract the files, and copy them into your fonts directory in control panel.  After a quick restart, Chrome will have full unicode support.

Code2000 Font Set

To test your new support, try out fbformat, and make some pretty formatted facebook statuses.

ADVERTISEMENT:

The AnonyBox – Squid, SOCKS, and OpenVPN, all for $15

8604662962023342023

With the recent return of CISPA, I purchased an anonymous VPN account with PrivateInternetAccess.  This system suited me fine for browsing, and had pretty good throughput, but soon caused some common problems.

I have seven systems in my internal network.  Some of them need to be accessible remotely (not possible through the VPN), some need to be anonymous only some of the time, and some need to be totally anonymized.  I could have set up openVPN on each system, and configured each with an extremely complicated iptable, but it seemed like overkill.

Then, by complete accident, I found the perfect solution:

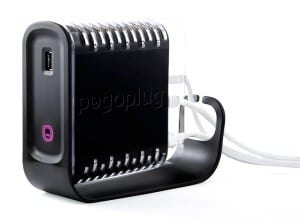
pogoplugproThe PogoPlug E02

Adorama had these little linux-based NAS systems on sale for an amazingly low $15, so I bought 3 just on a whim.

When I got them in the mail, the first project to spring to mind was what I’m calling: The AnonyBox. It is a stand-alone VPN client and SOCKS/HTTP Proxy host for my network.  With it, I can simply set any machine or program that needs anonymity to use it as a proxy, and everything else runs as expected.

I’ll detail the steps necessary to set up this stand-alone anonymizer in my next post.